본문 바로가기
Kubernetes/AWS EKS Workshop Study

1주차 2편 Amanon EKS 배포

by 개발자 영만 2024. 3. 10.

EKS 배포 방식

  • 웹 관리 콘솔
  • eksctl
  • IaC(CDK, CloudFormation, Terraform)


eksctl을 사용하여 EKS 배포

기본 아키텍처

  • CloudFormation을 사용해 기본 아키텍처 구성
    • VPC, Subnet, Bastion 서버 등
# yaml 파일 다운로드
curl -O https://s3.ap-northeast-2.amazonaws.com/cloudformation.cloudneta.net/K8S/myeks-1week.yaml

# 배포
aws cloudformation deploy \
    --template-file ~/Downloads/myeks-1week.yaml \
    --stack-name myeks \
    --parameter-overrides KeyName=kp-ihwoo SgIngressSshCidr=$(curl -s ipinfo.io/ip)/32 \
    --region ap-northeast-2

# ec2 에 SSH 접속 : root / qwe123
ssh root@$(aws cloudformation describe-stacks --stack-name myeks --query 'Stacks[*].Outputs[0].OutputValue' --output text)
root@@X.Y.Z.A's password: qwe123


EKS 배포 전 준비와 배포

  • 기본 Tool 및 SSH Key 설치 확인
# 기본 Tool 및 SSH Key 설치 확인
kubectl version --client=true -o yaml | yh
eksctl version
aws --version
ls /root/.ssh/id_rsa*

  • IAM User 자격 증명 설정
# IAM User 자격 구성 : 실습 편리를 위해 administrator 권한을 가진 IAM User 의 자격 증명 입력
aws configure
AWS Access Key ID [None]: AKIA5...
AWS Secret Access Key [None]: CVNa2...
Default region name [None]: ap-northeast-2
Default output format [None]: json
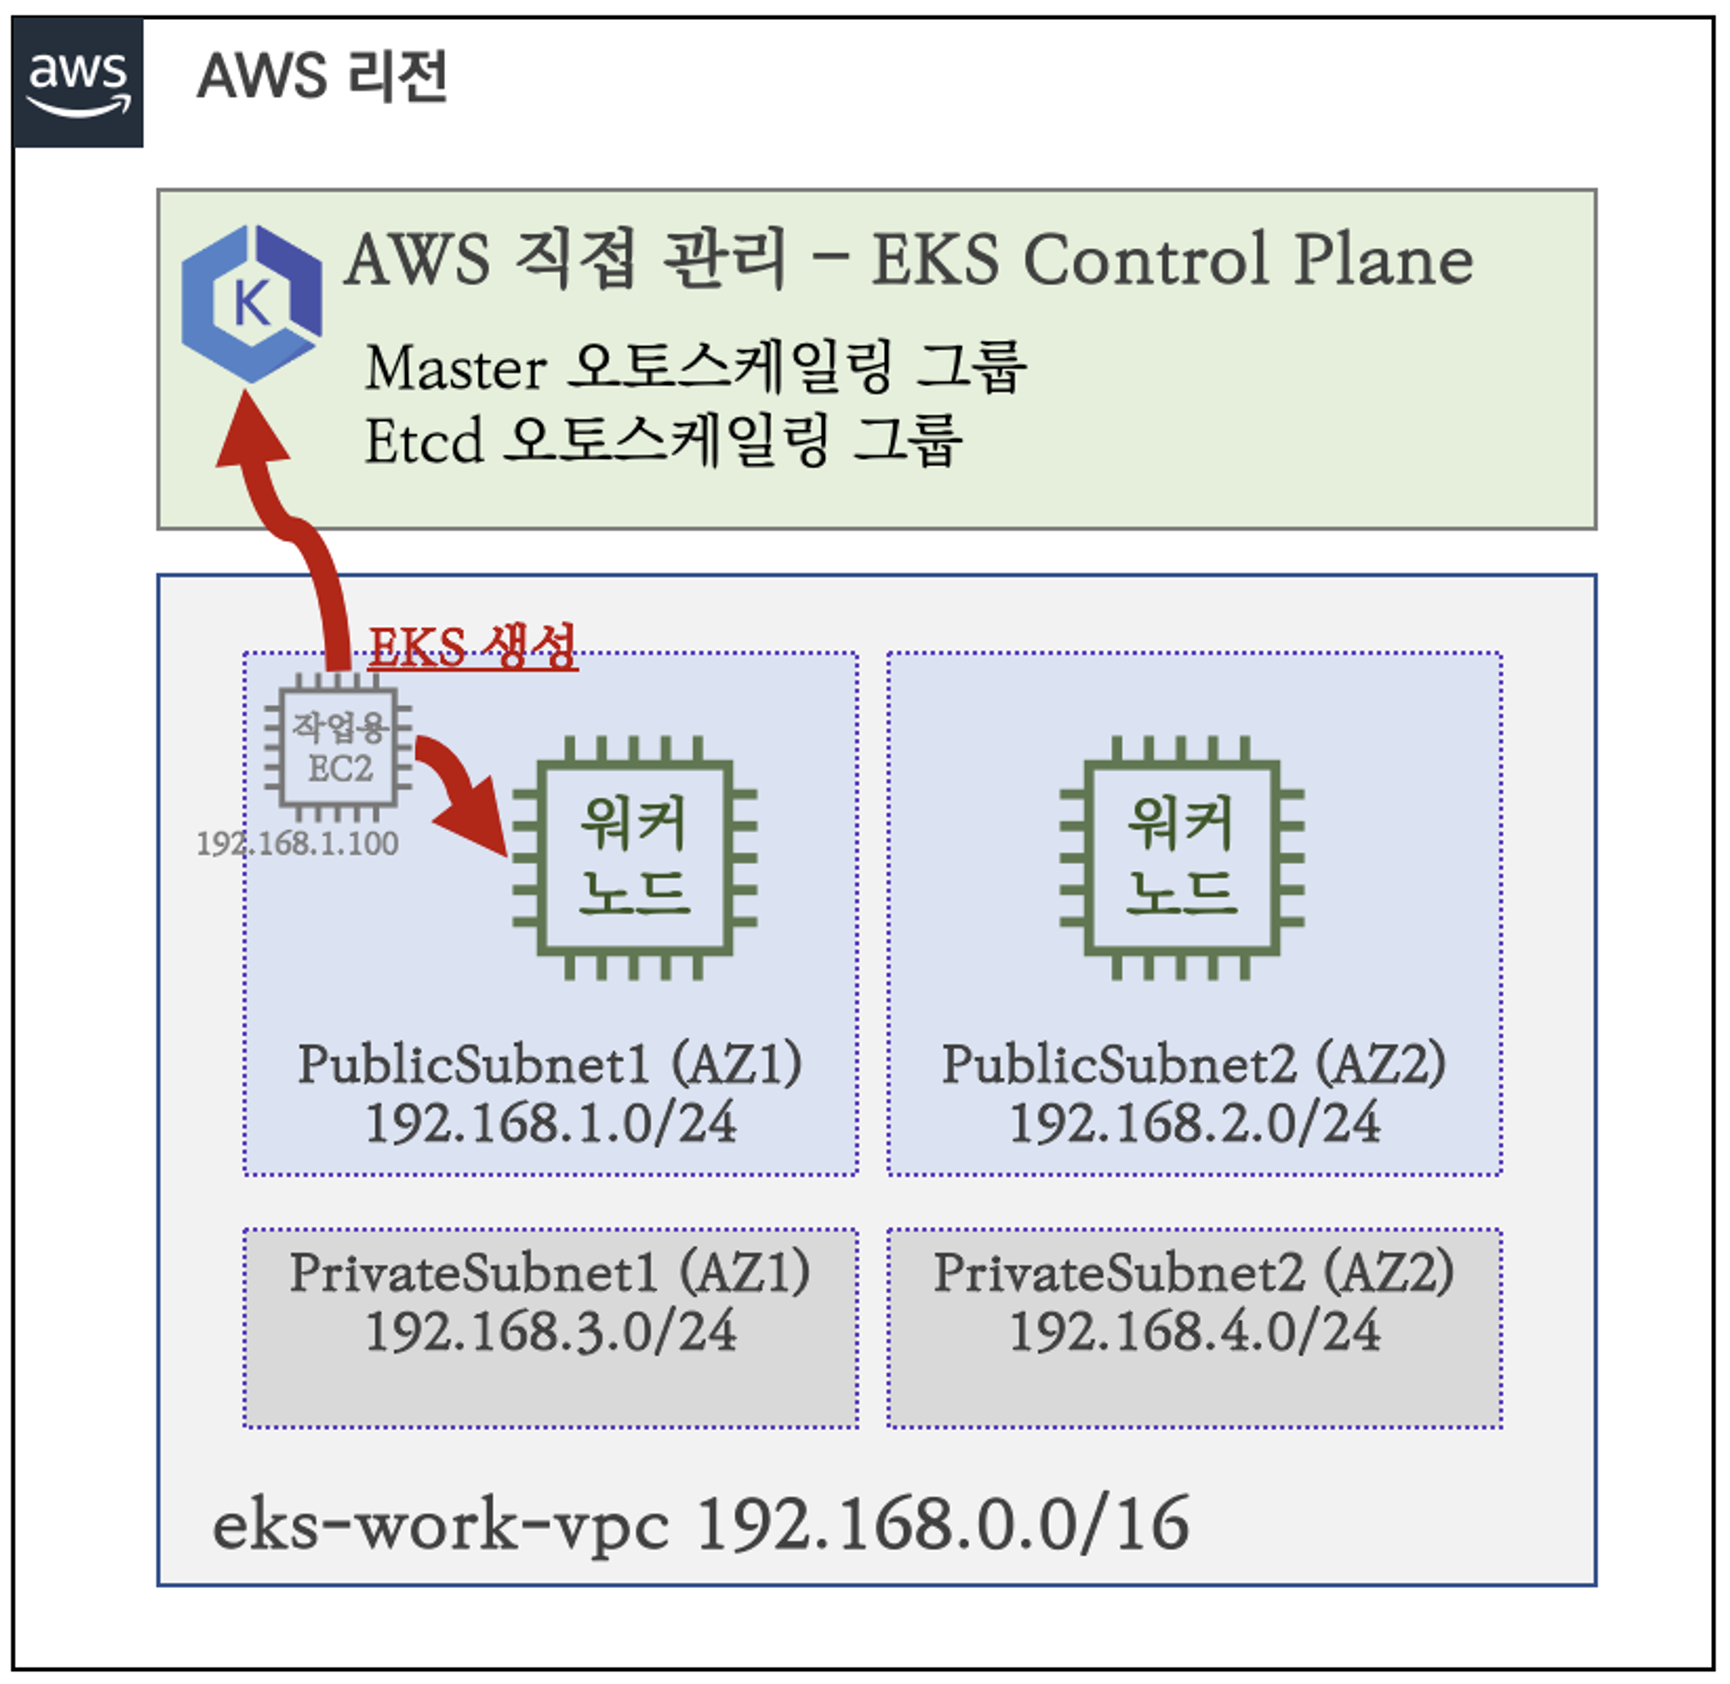
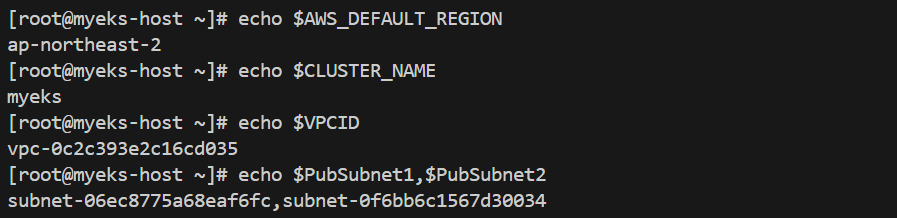
  • 배포 전 변수 확인
# 변수 확인
echo $AWS_DEFAULT_REGION
echo $CLUSTER_NAME
echo $VPCID
echo $PubSubnet1,$PubSubnet2

  • EKS 클러스터 & 관리형 노드 그룹 배포
# eks 클러스터 & 관리형노드그룹 배포: 총 15분 소요
eksctl create cluster \
    --name $CLUSTER_NAME \
    --region=$AWS_DEFAULT_REGION \
    --nodegroup-name=$CLUSTER_NAME-nodegroup \
    --node-type=t3.medium \
    --node-volume-size=30 \
    --vpc-public-subnets "$PubSubnet1,$PubSubnet2" \
    --version 1.28 \
    --ssh-access \
    --external-dns-access \
    --verbose 4


EKS 배포 후 정보 확인

  • EKS 클러스터 확인

  • Auto Scaling 그룹 및 인스턴스 확인

  • EKS 클러스터 정보 확인
# eks 클러스터 정보 확인
kubectl cluster-info
eksctl get cluster
aws eks describe-cluster --name $CLUSTER_NAME | jq -r .cluster.endpoint

  • EKS 노드 그룹 정보 확인
# eks 노드 그룹 정보 확인
eksctl get nodegroup --cluster $CLUSTER_NAME --name $CLUSTER_NAME-nodegroup
aws eks describe-nodegroup --cluster-name $CLUSTER_NAME --nodegroup-name $CLUSTER_NAME-nodegroup | jq

  • 노드 정보 확인
# 노드 정보 확인 : OS와 컨테이너런타임 확인
kubectl get node
kubectl get node --label-columns=node.kubernetes.io/instance-type,eks.amazonaws.com/capacityType,topology.kubernetes.io/zone
kubectl get node -o wide

    • 파드 정보 확인
# 파드 정보 확인
kubectl get pod -n kube-system
kubectl get pod -n kube-system -o wide
kubectl get pod -A


실습 완료 후 자원 삭제

  • EKS 클러스터 삭제
eksctl delete cluster --name $CLUSTER_NAME
  • 클러스터 삭제 완료 확인 후 CloudFormation 스택 삭제
aws cloudformation delete-stack --stack-name myeks