HPA는 애플리케이션의 CPU 사용량, 메모리 사용량 등의 지표를 기반으로 파드 수를 자동으로 확장 또는 축소합니다. 이것은 파드 수를 조정하여 애플리케이션의 부하에 따라 자동으로 스케일링될 수 있게 합니다.
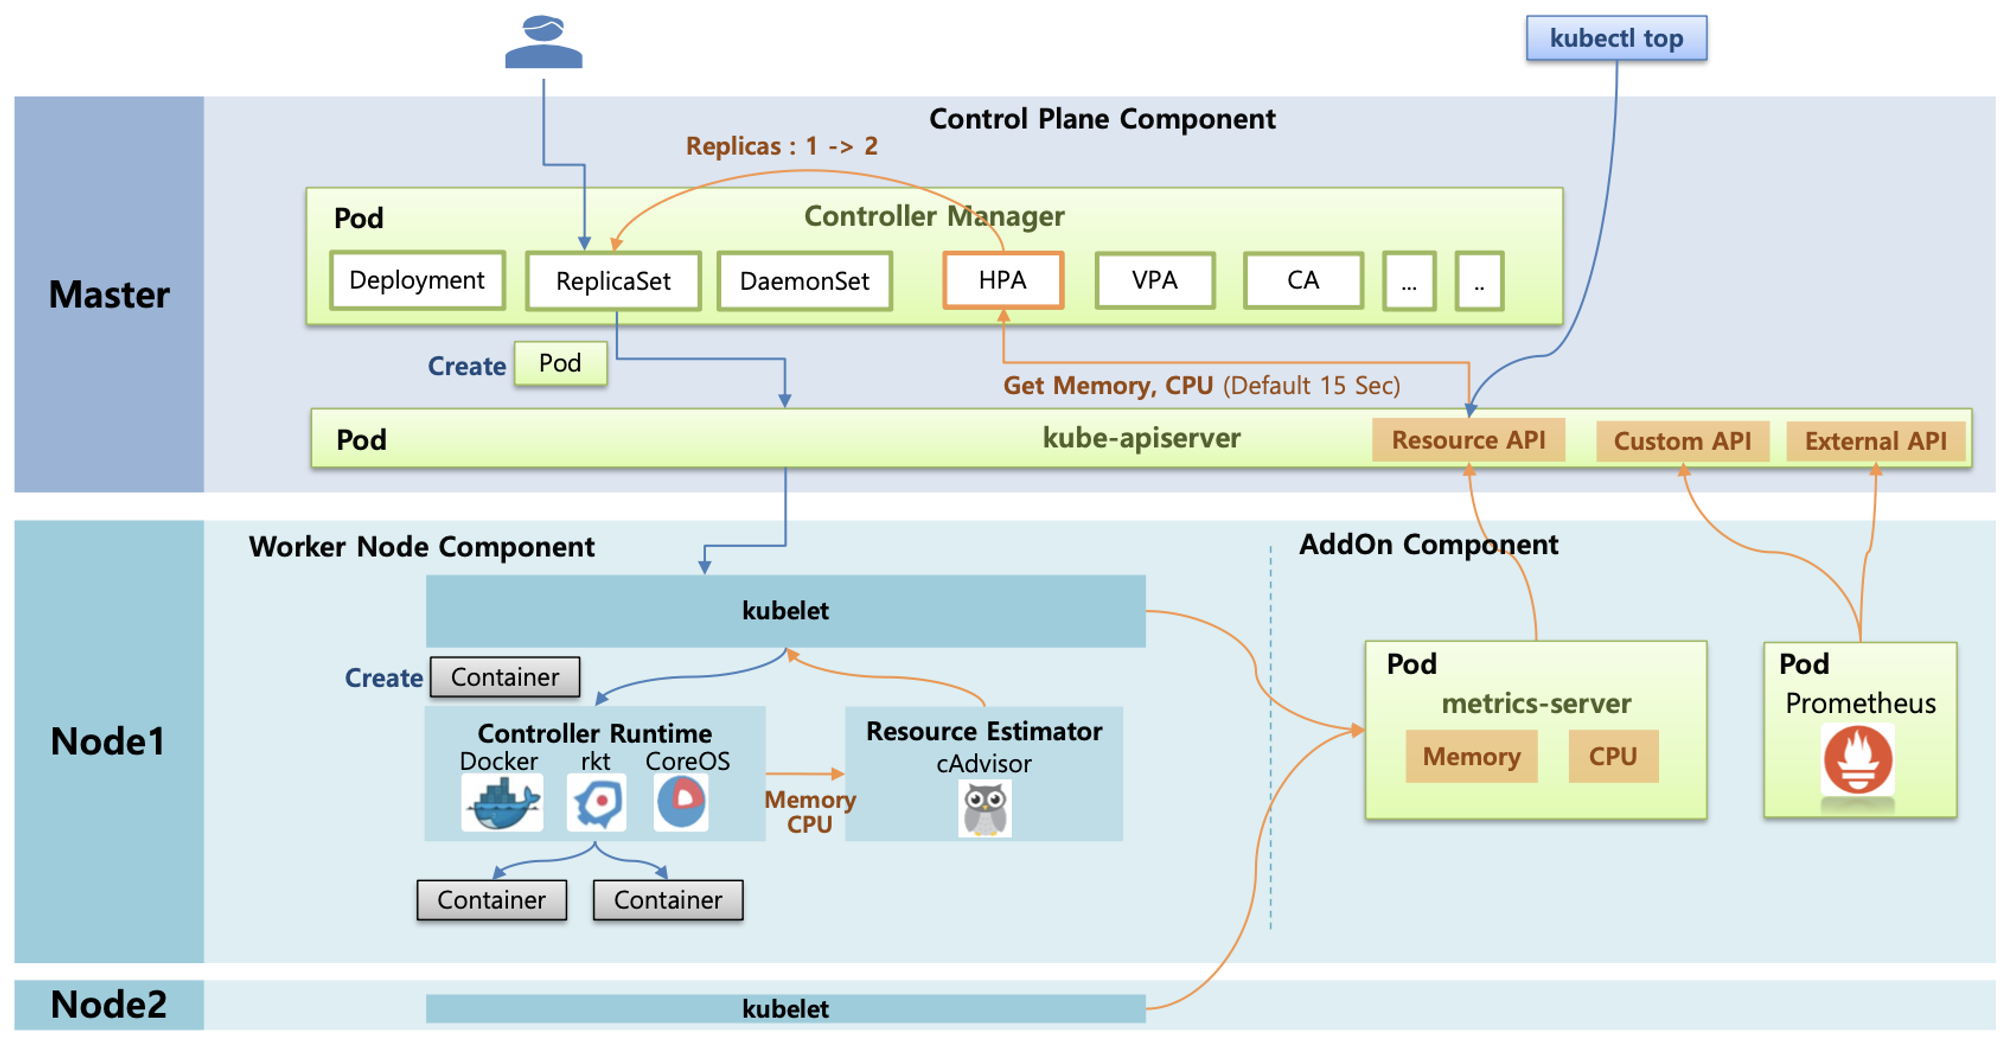
HPA 아키텍처
cAdvisor: cAdvisor는 각 노드에서 실행되는 컨테이너의 메모리 및 CPU 사용량과 같은 리소스 사용에 대한 정보를 수집합니다. 이 정보는 각 노드의 cAdvisor 컨테이너에서 수집되며, Prometheus 등의 시스템에서 수집된 데이터에 대한 엑세스를 제공합니다.
metrics-server: metrics-server는 각 노드의 kubelet을 통해 수집된 리소스 사용에 대한 정보를 수집하고, 이 정보를 클러스터의 모든 노드에서 수집합니다. 그런 다음 이러한 정보를 클러스터 내의 모든 Pod 및 노드에 대한 실시간 리소스 사용 정보로 제공합니다. 이 정보는 apiserver로 전달됩니다.
HPA Controller: HPA는 Kubernetes의 컨트롤러 중 하나입니다. HPA 컨트롤러는 apiserver(Resource API)를 통해 15초마다 metrics-server에서 수집된 메모리 및 CPU 사용량과 같은 리소스 사용에 대한 정보를 수집합니다. 이 정보를 기반으로 HPA는 설정된 스케일링 정책을 따라 파드의 수를 조정합니다. 예를 들어, 설정된 CPU 사용률이 특정 임계값을 초과하면 HPA는 파드의 수를 자동으로 확장합니다. HPA는 Kubernetes 클러스터에서 수행되며, 적절한 리소스 사용을 유지하고 애플리케이션의 가용성을 보장하기 위해 동작합니다.
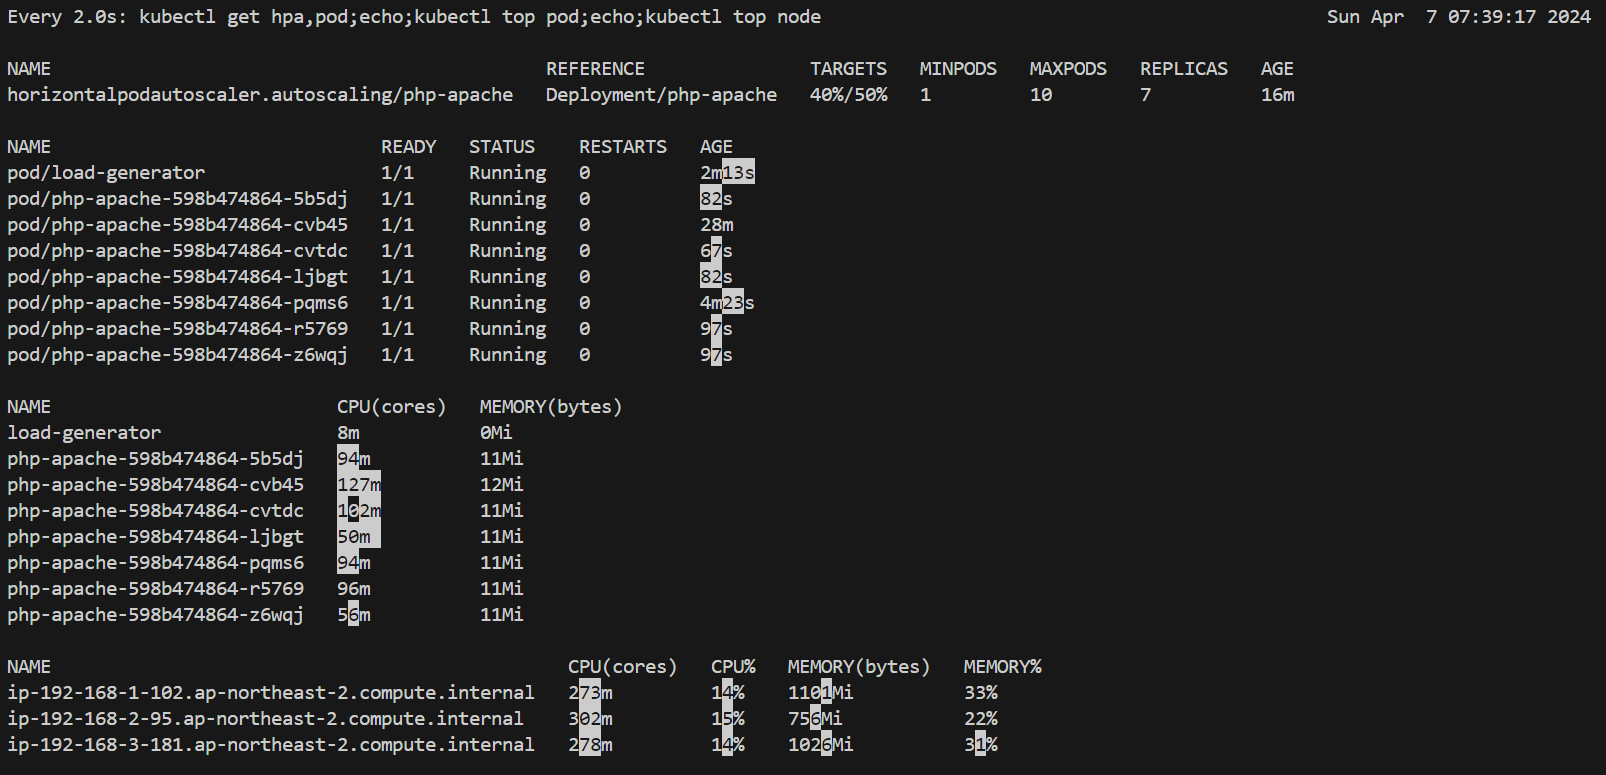
HPA 생성 및 부하 발생 후 오토 스케일링 테스트 : 증가 시 기본 대기 시간(30초), 감소 시 기본 대기 시간(5분) → 조정 가능
# Create the HorizontalPodAutoscaler : requests.cpu=200m - 알고리즘
# Since each pod requests 200 milli-cores by kubectl run, this means an average CPU usage of 100 milli-cores.
kubectl autoscale deployment php-apache --cpu-percent=50 --min=1 --max=10
kubectl describe hpa

# HPA 설정 확인
kubectl get hpa php-apache -o yaml | kubectl neat | yh
# 반복 접속 1 (파드1 IP로 접속) >> 증가 확인 후 중지
while true;do curl -s $PODIP; sleep 0.5; done

# 반복 접속 2 (서비스명 도메인으로 파드들 분산 접속) >> 증가 확인 후 중지 >> 중지 5분 후 파드 갯수 감소 확인
# Run this in a separate terminal
# so that the load generation continues and you can carry on with the rest of the steps
kubectl run -i --tty load-generator --rm --image=busybox:1.28 --restart=Never -- /bin/sh -c "while sleep 0.01; do wget -q -O- http://php-apache; done"
before
after
KEDA - Kubernetes based Event Driven Autoscaler
KEDA AutoScaler 소개
기존의 HPA(Horizontal Pod Autoscaler)는 리소스(CPU, Memory) 메트릭을 기반으로 스케일 여부를 결정하게 됩니다.
반면에 KEDA는 특정 이벤트를 기반으로 스케일 여부를 결정할 수 있습니다. 이는 특히 이벤트 중심 아키텍처를 가진 애플리케이션에 매우 유용합니다.
예를 들어, Airflow와 같은 작업 스케줄링 도구는 일정한 작업을 수행하고 이벤트를 생성할 수 있습니다. Airflow에서는 Metadb를 통해 현재 실행 중인 작업이나 대기 중인 작업 수를 알 수 있습니다. 이러한 이벤트를 KEDA에 연결하여, 작업 큐에 작업이 쌓일 때마다 워커(worker)의 스케일을 자동으로 조정할 수 있습니다.
KEDA는 이러한 이벤트를 감지하고 이벤트의 발생을 기반으로 특정 스케일링 행동을 수행할 수 있습니다. 따라서 작업 큐에 작업이 많이 쌓이면 KEDA가 자동으로 워커의 스케일을 늘리고, 작업이 줄어들면 워커를 줄일 수 있습니다. 이를 통해 애플리케이션의 성능을 유동적으로 조절할 수 있습니다.
https://keda.sh/docs/2.10/concepts/
KEDA Scalers : kafka trigger for an Apache Kafkatopic
triggers:
- type: kafka
  metadata:
    bootstrapServers: kafka.svc:9092 # Comma separated list of Kafka brokers “hostname:port” to connect to for bootstrap.
    consumerGroup: my-group          # Name of the consumer group used for checking the offset on the topic and processing the related lag.
    topic: test-topic                # Name of the topic on which processing the offset lag. (Optional, see note below)
    lagThreshold: '5'                # Average target value to trigger scaling actions. (Default: 5, Optional)
    offsetResetPolicy: latest        # The offset reset policy for the consumer. (Values: latest, earliest, Default: latest, Optional)
    allowIdleConsumers: false        # When set to true, the number of replicas can exceed the number of partitions on a topic, allowing for idle consumers. (Default: false, Optional)
    scaleToZeroOnInvalidOffset: false
    version: 1.0.0                   # Version of your Kafka brokers. See samara version (Default: 1.0.0, Optional)
KEDA with Helm
# KEDA 설치
cat <<EOT > keda-values.yaml
metricsServer:
  useHostNetwork: true

prometheus:
  metricServer:
    enabled: true
    port: 9022
    portName: metrics
    path: /metrics
    serviceMonitor:
      # Enables ServiceMonitor creation for the Prometheus Operator
      enabled: true
    podMonitor:
      # Enables PodMonitor creation for the Prometheus Operator
      enabled: true
  operator:
    enabled: true
    port: 8080
    serviceMonitor:
      # Enables ServiceMonitor creation for the Prometheus Operator
      enabled: true
    podMonitor:
      # Enables PodMonitor creation for the Prometheus Operator
      enabled: true

  webhooks:
    enabled: true
    port: 8080
    serviceMonitor:
      # Enables ServiceMonitor creation for the Prometheus webhooks
      enabled: true
EOT

kubectl create namespace keda
helm repo add kedacore https://kedacore.github.io/charts
helm install keda kedacore/keda --version 2.13.0 --namespace keda -f keda-values.yaml
# keda 네임스페이스에 디플로이먼트 생성
kubectl apply -f php-apache.yaml -n keda
kubectl get pod -n keda

# ScaledObject 정책 생성 : cron
cat <<EOT > keda-cron.yaml
apiVersion: keda.sh/v1alpha1
kind: ScaledObject
metadata:
  name: php-apache-cron-scaled
spec:
  minReplicaCount: 0
  maxReplicaCount: 2
  pollingInterval: 30
  cooldownPeriod: 300
  scaleTargetRef:
    apiVersion: apps/v1
    kind: Deployment
    name: php-apache
  triggers:
  - type: cron
    metadata:
      timezone: Asia/Seoul
      start: 00,15,30,45 * * * *
      end: 05,20,35,50 * * * *
      desiredReplicas: "1"
EOT
kubectl apply -f keda-cron.yaml -n keda
VPA - Vertical Pod Autoscaler
Vertical Pod Autoscaler 소개
VPA(Vertical Pod Autoscaler)는 주로 파드의 리소스 요청(request)을 최적화하는 데 사용됩니다. 이는 파드의 리소스 요청을 실제 사용량에 근거하여 조정하여 애플리케이션의 성능을 최적화하고 자원의 효율성을 높입니다.
HPA는 서로 다른 기능을 수행하므로 함께 사용할 수 없습니다. HPA는 파드의 수를 조절하여 애플리케이션의 가용성을 관리하는 데 사용되지만, VPA는 리소스 요청을 조정하여 성능을 최적화하는 데 사용됩니다.
VPA를 사용하여 파드의 리소스 요청을 수정하면 해당 파드는 재시작되어야 합니다. 이는 수정된 리소스 요청이 새로운 파드 스펙에 적용되어야 하기 때문입니다. 따라서 VPA를 사용하여 파드의 리소스 요청을 변경할 때는 잠시간 파드의 재시작이 발생할 수 있습니다.
# 코드 다운로드
git clone https://github.com/kubernetes/autoscaler.git
cd ~/autoscaler/vertical-pod-autoscaler/
tree hack

# openssl 버전 확인
openssl version
OpenSSL 1.0.2k-fips  26 Jan 2017

# openssl 1.1.1 이상 버전 확인
yum install openssl11 -y
openssl11 version
OpenSSL 1.1.1g FIPS  21 Apr 2020

# 스크립트파일내에 openssl11 수정
sed -i 's/openssl/openssl11/g' ~/autoscaler/vertical-pod-autoscaler/pkg/admission-controller/gencerts.sh

# Deploy the Vertical Pod Autoscaler to your cluster with the following command.
watch -d kubectl get pod -n kube-system
cat hack/vpa-up.sh
./hack/vpa-up.sh
kubectl get crd | grep autoscaling
kubectl get mutatingwebhookconfigurations vpa-webhook-config
kubectl get mutatingwebhookconfigurations vpa-webhook-config -o json | jq
pod가 실행되면 약 2~3분 뒤에 pod resource.reqeust가 VPA에 의해 수정
VPA에 spec.updatePolicy.updateMode를 Off 로 변경 시 파드에 Spec을 자동으로 변경 재실행 하지 않습니다. 기본값(Auto)
# 공식 예제 배포
cd ~/autoscaler/vertical-pod-autoscaler/
cat examples/hamster.yaml | yh
kubectl apply -f examples/hamster.yaml && kubectl get vpa -w

# 파드 리소스 Requestes 확인
kubectl describe pod | grep Requests: -A2

# VPA에 의해 기존 파드 삭제되고 신규 파드가 생성됨
kubectl get events --sort-by=".metadata.creationTimestamp" | grep VPA
cluster-autoscaler 파드 배치: 먼저 Kubernetes 클러스터에 cluster-autoscaler 파드를 배치합니다. 이는 일반적으로 디플로이먼트로 배포됩니다. 이 디플로이먼트는 CA를 실행하고 클러스터의 자동 스케일링을 담당합니다.
Pending 상태 파드 확인: CA는 클러스터의 상태를 모니터링하고, pending 상태인 파드가 발견되면 이를 처리하기 위해 작업을 수행합니다.
워커 노드 스케일 아웃: pending 상태인 파드가 존재할 경우, CA는 해당 파드를 처리하기 위해 워커 노드를 스케일 아웃합니다. 이를 통해 클러스터는 추가적인 자원을 확보하여 pending 상태인 파드를 실행할 수 있게 됩니다.
사용률 확인 및 스케일 인/아웃: CA는 지정된 간격으로 클러스터의 자원 사용률을 모니터링합니다. 사용률이 일정 임계값을 넘어서면 CA는 해당 ASG(Auto Scaling Group)에 대해 스케일 인/아웃 작업을 수행합니다. 이를 통해 클러스터는 자동으로 리소스를 조절하여 현재의 수요에 맞춰 최적화됩니다.
Auto Scaling Group(ASG) 사용: AWS에서는 Auto Scaling Group을 사용하여 EC2 인스턴스의 스케일링을 관리합니다. CA는 ASG와 통합하여 클러스터의 노드 수를 조정합니다. ASG는 EC2 인스턴스의 시작 및 종료를 관리하여 클러스터의 용량을 조절합니다.
Cluster Autoscaler(CA) 설정
설정 전 확인
# EKS 노드에 이미 아래 tag가 들어가 있음
# k8s.io/cluster-autoscaler/enabled : true
# k8s.io/cluster-autoscaler/myeks : owned
aws ec2 describe-instances  --filters Name=tag:Name,Values=$CLUSTER_NAME-ng1-Node --query "Reservations[*].Instances[*].Tags[*]" --output yaml | yh