본문 바로가기
Kubernetes/AWS EKS Workshop Study

7주차 2편 EKS CI/CD - Jenkins with Kubernetes, Argo

by 개발자 영만 2024. 4. 21.

Jenkins with Kubernetes

Jenkins 에서 k8s 사용을 위한 사전 준비

# root 계정에서 아래 복사 실행
cp ~/.kube/config /var/lib/jenkins/.kube/config
chown jenkins:jenkins /var/lib/jenkins/.kube/config

# jenkins 사용자에서 aws eks 사용(sts 호출 등)을 위한 자격증명 설정
aws configure
AWS Access Key ID [None]: AKIA5ILF2###
AWS Secret Access Key [None]: ###
Default region name [None]: ap-northeast-2

# jenkins 사용자에서 kubectl 명령어 사용 확인
kubectl get pods -A


파이프라인으로 디플로이먼트/서비스 배포

apiVersion: apps/v1
kind: Deployment
metadata:
  name: myweb
  labels:
    gitadd : webedit
spec:
  replicas: 4
  selector:
    matchLabels:
      app: mywebs
  template:
    metadata:
      name: myweb
      labels:
        app: mywebs
    spec:
      containers:
      - name: myweb
        image: ymannn/myweb:v1.0.0
      terminationGracePeriodSeconds: 0
---
apiVersion: v1
kind: Service
metadata:
  name: myweb
spec:
  ports:
    - name: webport
      port: 8080
      targetPort: 80
  selector:
    app: mywebs
  type: ClusterIP
---
  • item : k8s-1 , pipeline
pipeline {
    agent any

    tools {
        jdk 'jdk-17'
    }

    environment {
        DOCKERHUB_USERNAME = 'ymannn'
        GITHUB_URL = 'https://github.com/Y-mannn/aews-cicd.git'
        // deployment-svc.yaml -> image: ymannn/myweb:v1.0.0        
        DIR_NUM = '3'
    }

    stages {
        stage('Container Build') {
            steps {	
                // 릴리즈파일 체크아웃
                checkout scmGit(branches: [[name: '*/main']], 
                    extensions: [[$class: 'SparseCheckoutPaths', 
                    sparseCheckoutPaths: [[path: "/${DIR_NUM}"]]]], 
                    userRemoteConfigs: [[url: "${GITHUB_URL}"]])

                // 컨테이너 빌드 및 업로드
                sh "docker build -t ${DOCKERHUB_USERNAME}/myweb:v1.0.0 ./${DIR_NUM}"
                sh "docker push ${DOCKERHUB_USERNAME}/myweb:v1.0.0"
            }
        }

        stage('K8S Deploy') {
            steps {
                sh "kubectl apply -f ./${DIR_NUM}/deploy/deployment-svc.yaml"
            }
        }
    }
}
  • 모니터링
watch -d kubectl get pod,svc,ep
  • 접속 테스트용 파드
# 배포
cat <<EOF | kubectl create -f -
apiVersion: v1
kind: Pod
metadata:
  name: netpod
  labels:
    app: pod
spec:
  containers:
  - name: netshoot-pod
    image: nicolaka/netshoot
    command: ["tail"]
    args: ["-f", "/dev/null"]
  terminationGracePeriodSeconds: 0
EOF
  • 확인
#
kubectl exec -it netpod -- curl myweb:8080
kubectl exec -it netpod -- curl myweb:8080 | grep Web
while true; do kubectl exec -it netpod -- curl myweb:8080 | grep Web; echo; done

# 작업공간 확인
tree /var/lib/jenkins/workspace/k8s-1
cat /var/lib/jenkins/workspace/k8s-1/3/Dockerfile


Argo CD

Argo CD 소개 및 설치

  • Argo CD는 Kubernetes 네이티브 GitOps 도구로, Kubernetes 클러스터의 상태를 Git 리포지토리에 저장하여 관리하는 데 사용됩니다.
  • Architecture
    • API Server : Web UI 대시보드, k8s api 처럼 API 서버 역할
    • Repository Server : Git 연결 및 배포할 yaml 생성
    • Application Controller : k8s 리소스 모니터링, Git과 비교
    • Redis : k8s api와 git 요청을 줄이기 위한 캐싱
    • Notification : 이벤트 알림, 트리거
    • Dex : 외부 인증 관리
    • ApplicationSet Controller : 멀티 클러스터를 위한 App 패키징 관리
  • 설치
# helm 설치
cat <<EOT > argocd-values.yaml
global:
  domain: argocd.$MyDomain

configs:
  params:
    server.insecure: true

controller:
  metrics:
    enabled: true
    serviceMonitor:
      enabled: true

server:
  ingress:
    enabled: true
    controller: aws
    ingressClassName: alb
    hostname: "argocd.$MyDomain"
    annotations:
      alb.ingress.kubernetes.io/scheme: internet-facing
      alb.ingress.kubernetes.io/target-type: ip
      alb.ingress.kubernetes.io/backend-protocol: HTTP
      alb.ingress.kubernetes.io/listen-ports: '[{"HTTPS":80}, {"HTTPS":443}]'
      alb.ingress.kubernetes.io/certificate-arn: $CERT_ARN
      alb.ingress.kubernetes.io/ssl-redirect: '443'
    aws:
      serviceType: ClusterIP
      backendProtocolVersion: GRPC
  metrics:
    enabled: true
    serviceMonitor:
      enabled: true

repoServer:
  metrics:
    enabled: true
    serviceMonitor:
      enabled: true

applicationSet:
  metrics:
    enabled: true
    serviceMonitor:
      enabled: true

notifications:
  metrics:
    enabled: true
    serviceMonitor:
      enabled: true
EOT

kubectl create ns argocd
helm repo add argo https://argoproj.github.io/argo-helm
helm install argocd argo/argo-cd --version 6.7.11 -f argocd-values.yaml --namespace argocd

# 확인
kubectl get ingress,pod,svc -n argocd
kubectl get crd | grep argo

# 최초 접속 암호 확인
kubectl -n argocd get secret argocd-initial-admin-secret -o jsonpath="{.data.password}" | base64 -d ;echo


  • 최초 접속 https://argocd.<자신의도메인>
    • admin / <최초 접속 암호>
    • (옵션) 로그인 후 User info → UPDATE PASSWORD 변경 가능


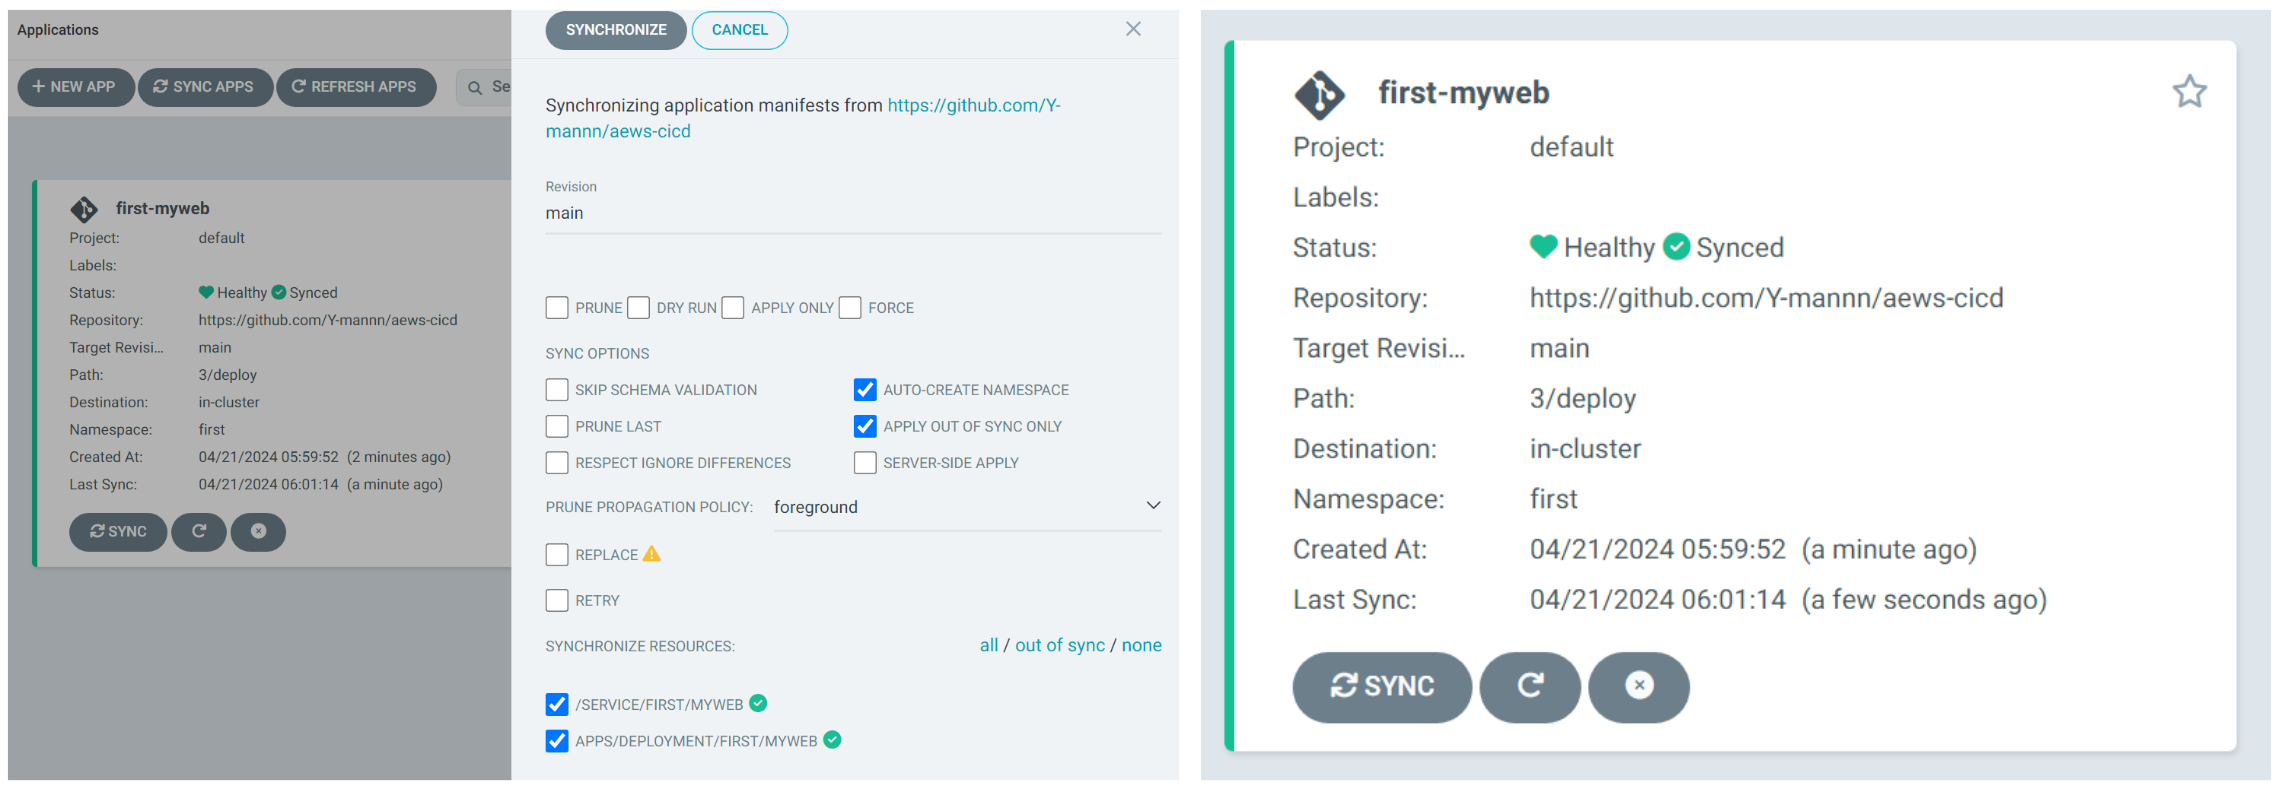
App 배포 with Directory

  • App 생성 : New App 클릭
    • Application Name : first-myweb
    • Project Name : default
    • SYNC POLICY : Manual
      • AUTO-CREATE NAMESPACE : 클러스터에 네임스페이스가 없을 시 argocd에 입력한 이름으로 자동 생성
      • APPLY OUT OF SYNC ONLY : 현재 동기화 상태가 아닌 리소스만 배포
    • PRUNE PROPAGATION POLICY
      • foreground : 부모(소유자, ex. deployment) 자원을 먼저 삭제함
      • background : 자식(종속자, ex. pod) 자원을 먼저 삭제함
      • orphan : 고아(소유자는 삭제됐지만, 종속자가 삭제되지 않은 경우) 자원을 삭제함
    • [체크] AUTO-CREATE-NAMESPACE
    • SOURCE
    • DESTINATION
    • 화면 상단 [CREATE] 클릭

  • 배포하기 - [SYNC] 클릭 > [SYNCHRONIZE] 클릭
    • PRUNE : GIt에서 자원 삭제 후 배포시 K8S에서는 삭제되지 않으나, 해당 옵션을 선택하면 삭제시킴
    • FORCE : --force 옵션으로 리소스 삭제
    • APPLY ONLY : ArgoCD의 Pre/Post Hook은 사용 안함 (리소스만 배포)
    • DRY RUN : 테스트 배포 (배포에 에러가 있는지 한번 확인해 볼때 사용)

  • 리소스 클릭 후 확인 : 각각 LIVE MANIFEST(쿠버네티스 정보) vs DESIRED MANIFEST(Git깃 정보)

  • Deployment 리소스 직접 수정 해보기 : EDIT 클릭 후 lables 아래 추가 → SAVE

# 모니터링
kubectl get deploy,svc -n first --show-labels
watch -d kubectl get deploy -n first --show-labels

  • k8s에서 직접 수정 → argocd 싱크(반영) 확인
# 아래 추가
kubectl edit deploy -n first myweb
...
  labels:
    add: label-test
    add2: k8s-test
...

  • 하지만 DESIRED MANIFEST & DIFF 에는 반영이 안되어있음 → Git을 통한 변경이 아닌 경우 반영 X

  • Git Repo화면에서 값 변경 후 → Commit 후 ArgoCD에서 DIFF 확인


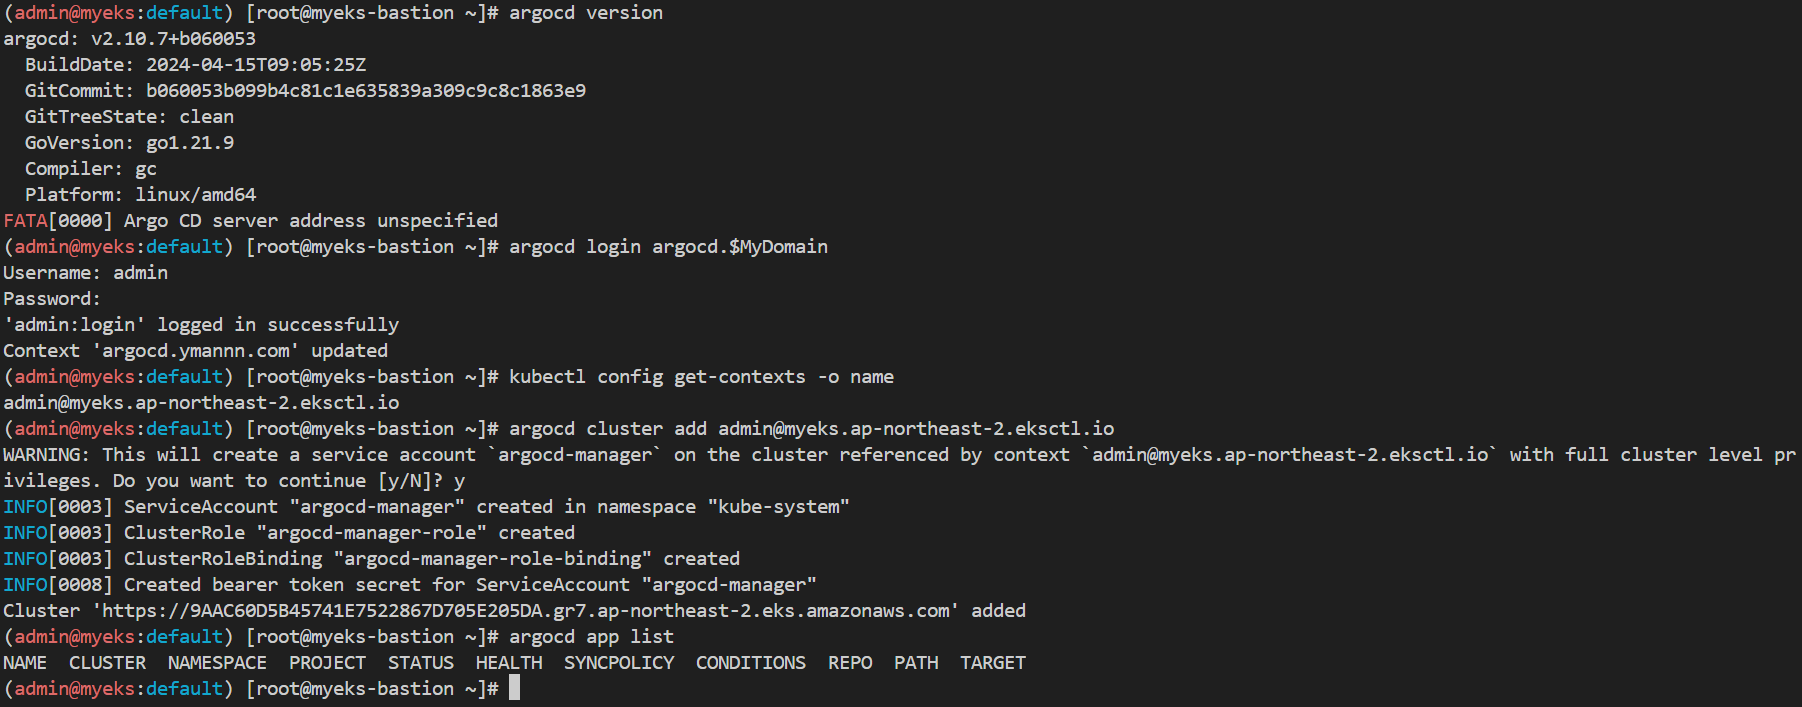
Getting Started : Argo CD CLI

  • Argo CD CLI
# 다운로드 및 설치
curl -sSL -o argocd-linux-amd64 https://github.com/argoproj/argo-cd/releases/latest/download/argocd-linux-amd64
sudo install -m 555 argocd-linux-amd64 /usr/local/bin/argocd
rm -f argocd-linux-amd64

# 버전 확인
argocd version

# Web Console 로그인과 동일하게 CLI에서 ArgoCD 로그인
argocd login argocd.$MyDomain

# 로그인 후 현재 사용 중인 context를 등록
kubectl config get-contexts -o name
admin@myeks.ap-northeast-2.eksctl.io
argocd cluster add admin@myeks.ap-northeast-2.eksctl.io
y 입력

# kubeclt 명령어와 비슷하게 get 명령어를 통하여 확인
argocd app list
NAME  CLUSTER  NAMESPACE  PROJECT  STATUS  HEALTH  SYNCPOLICY  CONDITIONS  REPO  PATH  TARGET

  • Application 생성 with CLi
#
kubectl config set-context --current --namespace=argocd
argocd app create guestbook --repo https://github.com/argoproj/argocd-example-apps.git --path guestbook --dest-server https://kubernetes.default.svc --dest-namespace default

#
argocd app list
NAME              CLUSTER                         NAMESPACE  PROJECT  STATUS     HEALTH   SYNCPOLICY  CONDITIONS  REPO                                                 PATH       TARGET
argocd/guestbook  https://kubernetes.default.svc  default    default  OutOfSync  Missing  <none>      <none>      https://github.com/argoproj/argocd-example-apps.git  guestbook

  • Sync (Deploy) The Application
argocd app sync guestbook


Argo Rollouts

Argo Rollouts 소개 및 설치

  • Argo Rollouts는 Kubernetes controller와 CRD의 집합으로, blue-green 배포, canary 배포, Rolling update와 같은 고급 배포 기능을 Kubernetes에 제공합니다. Argo Rollouts를 통해 Kubernetes 환경에서 혁신적인 배포 전략을 적용하고 실험적 기능을 안전하게 테스트할 수 있습니다.
  • 설치
#
cat <<EOT > argorollouts-values.yaml
dashboard:
  enabled: true
  ingress:
    enabled: true
    ingressClassName: alb
    hosts:
      - argorollouts.$MyDomain
    annotations:
      alb.ingress.kubernetes.io/scheme: internet-facing
      alb.ingress.kubernetes.io/target-type: ip
      alb.ingress.kubernetes.io/backend-protocol: HTTP
      alb.ingress.kubernetes.io/listen-ports: '[{"HTTPS":80}, {"HTTPS":443}]'
      alb.ingress.kubernetes.io/certificate-arn: $CERT_ARN
      alb.ingress.kubernetes.io/ssl-redirect: '443'
EOT

kubectl create ns argo-rollouts
helm install argo-rollouts argo/argo-rollouts --version 2.35.1 -f argorollouts-values.yaml --namespace argo-rollouts

# 확인
kubectl get all -n argo-rollouts
kubectl get crd | grep argo


  • rollouts 대시보드 : 네임스페이스별 확인 가능
    • https://argorollouts.<자신의 도메인>/rollouts/
  • rollouts cli
# argorolloutscli 설치
curl -LO https://github.com/argoproj/argo-rollouts/releases/download/v1.6.4/kubectl-argo-rollouts-linux-amd64
chmod +x ./kubectl-argo-rollouts-linux-amd64
mv ./kubectl-argo-rollouts-linux-amd64 /usr/local/bin/kubectl-argo-rollouts

# 설치 확인
kubectl argo rollouts version


Deploying a Rollout

  • Rollout 배포
spec:
  replicas: 5
  strategy:
    canary:
      steps:
      - setWeight: 20
      - pause: {}
      - setWeight: 40
      - pause: {duration: 10}
      - setWeight: 60
      - pause: {duration: 10}
      - setWeight: 80
      - pause: {duration: 10}

# Run the following command to deploy the initial Rollout and Service:
kubectl apply -f https://raw.githubusercontent.com/argoproj/argo-rollouts/master/docs/getting-started/basic/rollout.yaml
kubectl apply -f https://raw.githubusercontent.com/argoproj/argo-rollouts/master/docs/getting-started/basic/service.yaml


  • CLI vs UI 확인
kubectl argo rollouts get rollout rollouts-demo
kubectl argo rollouts get rollout rollouts-demo --watch

  • Rollout 업데이트
# Run the following command to update the rollouts-demo Rollout with the "yellow" version of the container:
kubectl argo rollouts set image rollouts-demo rollouts-demo=argoproj/rollouts-demo:yellow

  • Promoting a Rollout
# 아래 입력 혹은 UI에서 Promote Yes 클릭
kubectl argo rollouts promote rollouts-demo